
[ad_1]
Step-by-Step Guide: How to Create a Business Account on Gmail.com
In today’s digital world, having a professional email address is crucial for any business. Among the countless email service providers available, Gmail.com is a popular and reliable choice. Not only does it offer a simple and user-friendly interface, but it also provides numerous features that can enhance your business communication. In this step-by-step guide, we will walk you through the process of creating a business account on Gmail.com.
Step 1: Visit Gmail.com
To get started, open your web browser and navigate to www.gmail.com. Once the page loads, you will see the option to either ‘Sign in’ or ‘Create account.’ Since you don’t have an account yet, click on ‘Create account’ to begin the process.
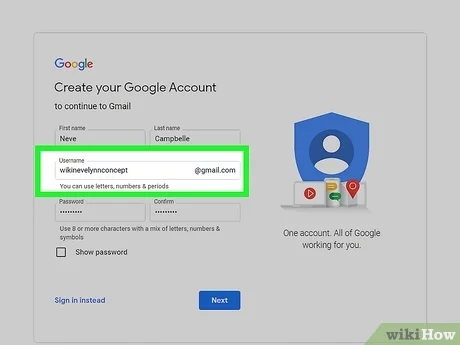
Step 2: Fill in your personal information
Gmail.com requires you to provide some personal information to complete the registration process. Start by entering your first and last name in the designated fields. It’s recommended to use your real name to create a professional impression for your business.
Next, choose a unique email address for your business. Try to select an address that reflects your business name or industry. If your preferred email address is not available, Gmail will suggest some alternative options. Once you settle on a suitable address, click on the ‘Next’ button.
Step 3: Create and verify your password
It’s crucial to choose a strong and secure password to protect your business account from potential cyber threats. Create a password that combines upper and lowercase letters, numbers, and special characters.
After creating your password, you will be prompted to re-enter it to ensure accuracy. Once done, click on the ‘Next’ button to proceed. Gmail will then send a verification code to the mobile number you provided. Enter the verification code in the designated field to complete this step.

Step 4: Set up account recovery options
To safeguard your business account and ensure access in case of any issues, set up account recovery options. You will be asked to provide an alternative email address and a phone number. It’s essential to provide valid and accessible options.
Step 5: Review privacy and terms
Before finalizing your account setup, it’s important to review and accept Gmail’s privacy policy and terms of service. Make sure you understand the terms and conditions and proceed to the next step once you’re satisfied.
Step-by-Step Guide: Creating a Professional Business Email on Gmail
Step 6: Customize your Gmail account
Once you have completed the initial setup process, you can now personalize your Gmail account. You have the option to choose a profile picture, customize the theme, and organize your inbox to fit your preferences.
Step 7: Explore Gmail features for businesses
Now that your business account is up and running, take some time to explore the various features that Gmail offers to enhance your business communication. Some notable features include Google Meet for video conferencing, Google Drive for cloud storage, and Google Calendar for scheduling and collaboration.
Step 8: Connect your business domain (optional)
For a more professional touch, you may want to consider connecting your business domain to your Gmail account. This will allow you to send and receive emails using your custom domain name. You can find detailed instructions on how to set up a custom domain in the Gmail support resources.
Step 9: Secure your account
Lastly, ensure the security of your Gmail business account by enabling two-factor authentication. This additional security layer adds an extra step during login, requiring you to provide a verification code sent to your mobile device. This greatly reduces the risk of unauthorized access to your account.
In conclusion, creating a business account on Gmail.com is a simple and straightforward process. By following this step-by-step guide, you can set up your account in no time and enjoy the benefits of a professional email address. Remember to explore the various features Gmail offers for businesses and take steps to secure your account.
[ad_2]