[ad_1]
Step-by-Step Guide: How to Set Up a Google Business Email Account
In today’s digital age, having a professional email address is essential for businesses. While there are many email service providers available, Google’s business email account, known as G Suite, is widely regarded as one of the best options. G Suite offers a range of benefits, including a more professional email address, increased storage space, and access to other Google tools. If you’re looking to set up a Google business email account, follow this step-by-step guide to get started.
Step 1: Choose a G Suite Plan
Before setting up your Google business email account, you need to decide on a G Suite plan. Google offers multiple plans to choose from, depending on your business needs. The Basic plan starts at $6 per user per month, while the Business and Enterprise plans offer more features at higher prices. Visit the G Suite pricing page to explore the different options and select the plan that best suits your requirements.
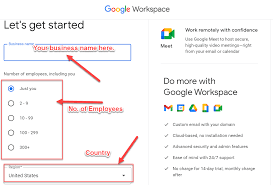
Step 2: Sign Up for G Suite
Once you’ve chosen the G Suite plan you want, visit the G Suite website and click on the “Get Started” button. You’ll be guided through a series of steps to create your G Suite account. Start by entering your business name, the number of employees, and your country. You’ll also need to provide your current email address and create an Administrator email address that will be associated with your G Suite account.
Step 3: Verify Domain Ownership
To set up your Google business email account, you’ll need to verify that you own the domain associated with it. Google provides multiple verification methods, including adding a DNS TXT or CNAME record, adding an HTML file to your website, or adding a meta tag to your homepage. Choose the method that works best for you and follow the instructions provided by Google to complete the verification process.
Step 4: Set Up Your Business Email Account
Once your domain ownership is verified, you can start setting up your business email account. Sign in to your G Suite account using the Administrator email address you created earlier. You’ll be prompted to add users, set up email addresses, and customize your account settings. Take your time to fill in the required information accurately, as this will determine your business email address and other email functionalities.
Step 5: Configure Email Delivery
To ensure smooth email delivery, you need to configure your Domain Name System (DNS) settings. This involves adding MX (Mail Exchange) records to your domain’s DNS settings, which will direct email messages to your G Suite account. Google provides detailed instructions on how to add MX records for various domain providers, so you can easily follow the guidelines to configure your email delivery.
Step 6: Customize Your Email
With the basic setup complete, you can now customize your Google business email account. G Suite offers various features to enhance your email experience, such as adding a business logo, creating email aliases, setting up email signatures, and configuring filters to organize your inbox. Spend some time exploring these options and make adjustments according to your preferences and branding requirements.

Step 7: Set Up Email Clients or Use the Web Interface
With your Google business email account ready to go, you have two options for accessing your emails. You can use the G Suite web interface, which allows you to access your emails from any device with an internet connection. Alternatively, you can set up your email client (e.g., Outlook or Apple Mail) to receive and send emails through your business email account. Google provides detailed instructions for setting up various email clients, so you can choose the option that suits you best.
Step 8: Add Email Accounts for Employees
If you have employees who need access to your business email account, you can easily add their email accounts as users within your G Suite account. Go to the Admin console, select “Users,” and click on the “+” button to add new users. Follow the instructions to set up their email addresses, assign account permissions, and customize their settings. This way, your employees can have their own professional email addresses tied to your business domain.
Step 9: Train Employees on G Suite Tools
Once your Google business email account is set up, it’s important to ensure that your employees are familiar with the various G Suite tools available. Google provides access to collaborative tools such as Google Drive, Docs, Sheets, and Calendar. These tools can significantly enhance productivity and collaboration in your organization. Invest some time in training your employees on how to best utilize these tools, as it can streamline your business workflows.
Unlocking Success: Steps to Becoming a Google Screened Real Estate Agent
Step 10: Enjoy the Benefits of G Suite
Congratulations, you’ve successfully set up your Google business email account! Now you can enjoy the many benefits that come with G Suite. From a more professional email address and increased storage space to improved collaboration and productivity tools, G Suite offers a comprehensive solution for businesses of all sizes. Make sure to regularly access your G Suite account to manage users, adjust settings, and stay up to date with any updates or new features that Google introduces.
In conclusion, setting up a Google business email account using G Suite is a straightforward process that can bring numerous advantages to your business. Follow this step-by-step guide and start leveraging the power of G Suite to enhance your email communication and productivity today.
[ad_2]