
[ad_1]
Mastering Business Communication: A Step-By-Step Guide to Setting up Business Email with Gmail
Effective communication is crucial for success in the business world. It allows organizations to establish and maintain relationships with clients, partners, and employees. One of the most common methods of communication in today’s digital age is email. As a business owner or professional, it is essential to learn how to set up and use a business email account effectively. In this step-by-step guide, we will focus on setting up a business email with Gmail, one of the most popular and reliable email platforms.
Step 1: Choose a Professional Domain
The first step in setting up your business email with Gmail is to have a professional domain name for your company. A domain name is your website’s address and acts as your brand in the online world. It is recommended to choose a domain name that aligns with your company name, making it easily recognizable and memorable.
Step 2: Sign Up for Gmail
Once you have selected your domain name, go to Gmail’s sign-up page and create an account. You can do this by visiting www.gmail.com and clicking on “Create Account.” Follow the instructions provided, including entering your personal information and selecting a unique username and password. Be sure to choose a professional username that reflects your business, such as yourname@yourcompany.com.
Step 3: Connect Your Domain to Gmail
Now that you have a Gmail account, you need to connect your domain to it. This step requires adjusting your domain’s DNS settings. To do this, log in to your domain provider’s website (e.g., GoDaddy, Namecheap) and locate the DNS settings. Add the necessary records provided by Gmail to connect your domain to your email. These records typically include MX (mail exchange) and SPF (sender policy framework) entries.

Step 4: Set up Business Email Forwarding
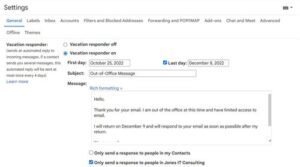
Email forwarding allows you to receive emails sent to your business email address directly in your Gmail inbox. To set up email forwarding, go to the Gmail settings by clicking on the gear icon in the top-right corner of your Gmail homepage and selecting “See all settings.” Then, navigate to the “Forwarding and POP/IMAP” tab. Here, click on “Add a forwarding address” and enter your business email address. Follow the instructions to complete the verification process, and select the option to forward incoming mail to your Gmail address.
Step 5: Sending Emails from Your Business Email Address
To send emails using your business email address within your Gmail account, you need to set up the “Send mail as” feature. In the same “Settings” menu, go to the “Accounts and Import” tab. Under the “Send mail as” section, click on “Add another email address.” Enter your business email address and follow the prompts to verify ownership. After verification, you will be able to select your business email as the default address when composing emails.
Unlocking Success: Steps to Becoming a Google Screened Real Estate Agent
Step 6: Organize Your Inbox with Labels and Filters
Managing your inbox efficiently is crucial for effective business communication. Gmail offers several features that can help you stay organized. Labels allow you to categorize different types of emails and folders can be created accordingly. To apply a label, select an email and click on the “Labels” option above the email thread. Creating filters can automatically sort incoming emails based on specific criteria, such as sender, subject, or keywords. You can set up filters in the “Filters and Blocked Addresses” tab of the Gmail settings.
Step 7: Utilize Canned Responses
As a business professional, you may find yourself composing similar emails repeatedly. Gmail offers a feature called “Canned Responses” that allows you to save email templates, saving you time and effort. To enable this feature, go to the “Settings” menu and click on the “Advanced” tab. Enable the “Canned Responses” option, and you can start creating and saving your email templates for future use.
Step 8: Secure Your Business Email
Security is paramount when it comes to business communications. Gmail offers various security features to protect your email account from unauthorized access. Enable two-factor authentication (2FA) to add an additional layer of security to your account. This feature requires you to enter a verification code sent to your mobile device when logging in from unrecognized devices. Additionally, regularly update your password and be cautious when opening suspicious emails or links.
Step 9: Master Gmail’s Advanced Features
Gmail has an array of advanced features that can help you streamline your business communications. Explore features such as scheduling emails, using keyboard shortcuts, creating email signatures, and integrating with other tools like Google Calendar and Google Drive. Familiarizing yourself with these advanced features can significantly improve your email efficiency and productivity.
Step 10: Continuously Improve your Business Communication Skills
Setting up and using business email with Gmail is just the first step in mastering business communication. Continuously improving your communication skills is essential for effective professional interactions. Focus on writing clear, concise emails, using proper grammar and punctuation. Pay attention to tone and be polite and professional in your communications. Regularly assess your email practices, seek feedback from colleagues or mentors, and adapt your approach accordingly.
Wrapping Up
Mastering business communication through effective email usage can significantly contribute to your professional success. By following this step-by-step guide to setting up a business email with Gmail, you have laid the foundation for seamless communication. Remember to choose a professional domain name, connect your domain to Gmail, set up email forwarding, send emails using your business address, organize your inbox, utilize advanced features, ensure security, and continuously improve your communication skills. With these tips, you are on your way to becoming a proficient business communicator.
[ad_2]