[ad_1]
Step-By-Step Guide: Setting Up Your Google Business Email
In today’s digital age, having a professional email address is essential for any business. A personalized business email using your own domain name adds credibility and trustworthiness to your brand. Google Business Email, also known as Google Workspace, offers a powerful and intuitive platform for creating and managing your business email accounts. In this step-by-step guide, we will walk you through the process of setting up your Google Business Email.
Step 1: Choose Your Domain Name
Before setting up your Google Business Email, you need to have a domain name registered for your business. If you already have a domain name, you can skip this step. If not, there are plenty of domain registration services available online. Choose a domain name that reflects your business and is easy to remember for your customers.
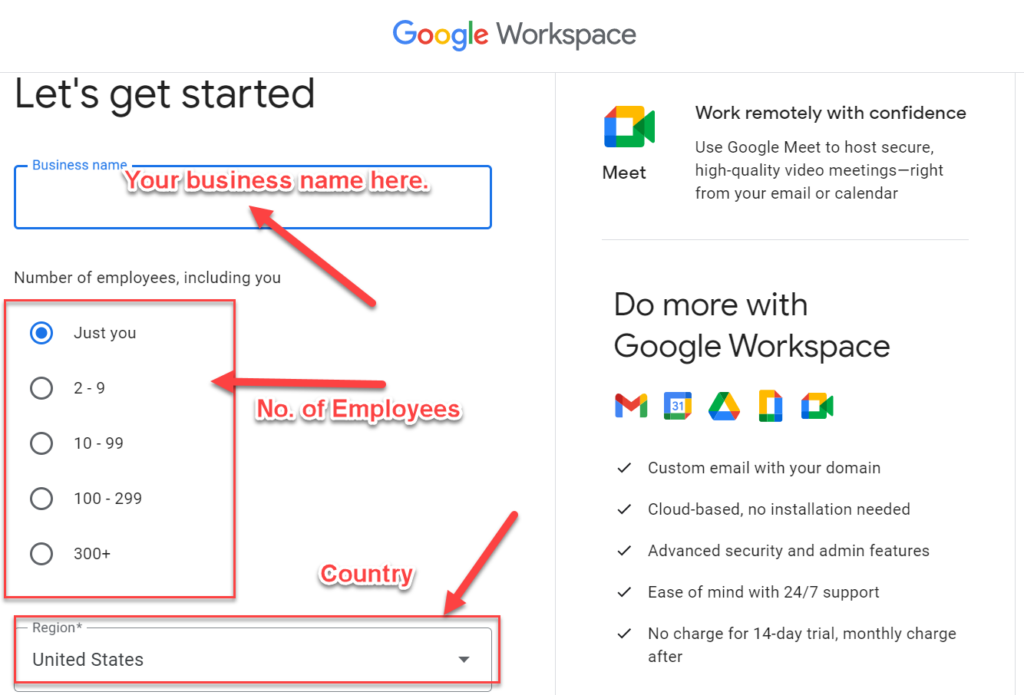
Step 2: Sign Up for Google Workspace
Go to the Google Workspace website and sign up for an account. You will be asked to enter your domain name during the registration process. Make sure to provide accurate and up-to-date information. Google will use this information to verify your ownership of the domain.
Step 3: Verification
After signing up, you will need to verify your ownership of the domain. Google offers several verification methods, including adding a meta tag to your website’s HTML, adding a DNS record, or uploading an HTML file to your website’s hosting server. Choose the method that is most convenient for you and follow the instructions provided by Google. Once the verification is complete, you can proceed to the next step.
Step 4: Setting Up Email Accounts
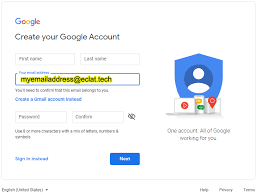
Once your domain ownership is verified, you can start setting up your business email accounts. Google Business Email allows you to create multiple email addresses using your domain name. For example, if your domain name is “example.com,” you can create email addresses such as “info@example.com,” “sales@example.com,” or “support@example.com.”
To set up an email account, go to the Google Workspace admin console and sign in with your credentials. From the dashboard, navigate to the “Users” section and click on “Add new user.” Fill in the required information, including the first name, last name, and desired email address. You can also set a password for the account or allow the user to create their own. Once done, click on “Create” to create the email account.
Unlock the Potential of Your Business with a Seamless Google Email Setup
Step 5: Email Configuration
After creating your email accounts, you need to configure the email settings. This includes setting up email forwarding, setting up email signatures, and enabling email aliases. Email forwarding allows you to receive emails sent to your business email address in an existing email account, such as your personal Gmail account. Email signatures are a great way to add a professional touch to your emails with your contact information and branding. Lastly, email aliases allow you to receive emails sent to different variations of your email address.
To configure these settings, go to the Google Workspace admin console and navigate to the “Apps” section. Click on “Google Workspace” and select “Gmail.” From there, you can configure email forwarding, email signatures, and email aliases as per your requirements.
Step 6: Mobile Access
In today’s mobile-centric world, it is crucial to have access to your business email on the go. Google Business Email offers seamless integration with mobile devices, allowing you to access your email accounts from anywhere. Download the Google Workspace app from the App Store or Google Play Store and sign in with your business email credentials.
Once signed in, you can receive and send emails, manage your contacts, and access your calendar, all from the comfort of your mobile device.
Step 7: Security and Privacy
Google Business Email provides robust security features to protect your business data and emails. Take advantage of these features to ensure the privacy and integrity of your email communication. Enable two-step verification for an added layer of security and regularly update your passwords.
Additionally, educate your team members on best practices for email security, such as avoiding suspicious links and attachments, and being cautious about sharing sensitive information via email.
Step 8: Support and Resources
Google offers extensive support and resources to help you get the most out of your Google Business Email. Visit the Google Workspace Help Center for user guides, video tutorials, and troubleshooting information. You can also join the Google Workspace Community to connect with other users and experts for advice and support.
In conclusion, setting up your Google Business Email is a straightforward process that can greatly enhance your business’s online presence and professional image. By following this step-by-step guide, you can create personalized email accounts using your own domain name, configure important settings, and ensure the security and privacy of your business communications. With Google Business Email, you are well-equipped to communicate effectively and efficiently with your clients and customers.
[ad_2]