
[ad_1]
Step-by-Step Guide: How to Set Up a Personalized Gmail Domain
In today’s digital world, having a personalized email domain is crucial for individuals and businesses alike. It adds a touch of professionalism to your email communications and can help you create a strong online presence. Gmail, one of the most popular email service providers, offers a convenient and user-friendly way to set up a personalized domain. In this step-by-step guide, we will walk you through the process of setting up a personalized Gmail domain.
Step 1: Choose a Domain Provider
The first step in setting up a personalized Gmail domain is to choose a domain provider. There are several domain providers available, such as GoDaddy, Namecheap, and Google Domains. Research and compare the options to find one that suits your needs in terms of pricing, user interface, and customer support.
Step 2: Register your Domain
Once you have chosen a domain provider, it’s time to register your desired domain name. The process may vary slightly depending on the provider, but generally, you will need to search for available domain names and select one that best represents your brand or personal identity. Follow the prompts to complete the registration and make the necessary payment.
Step 3: Set up DNS Records
Now that you have registered your domain, you need to set up Domain Name System (DNS) records to connect it to Gmail. Log in to your domain provider’s website and locate the DNS management section. Look for the option to add custom DNS records. Create a new TXT record and paste in the verification code provided by Gmail to verify your ownership of the domain.

Step 4: Configure Gmail
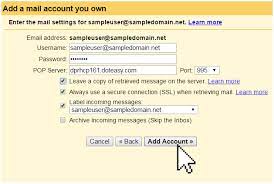
After verifying your domain ownership, it’s time to configure Gmail to use your personalized domain. Open your Gmail account and go to the settings menu by clicking on the gear icon in the top right corner. Select “See all settings” and navigate to the “Accounts and Import” tab. In the “Send mail as” section, click on the “Add another email address” button.
Streamline Your Business Email with Gmail’s Custom Domain Feature
Step 5: Add your Personalized Domain
In the window that appears, enter the name you want to display when sending emails from your personalized domain. Then, enter your personalized email address, such as info@yourdomain.com. Make sure the “Treat as an alias” option is checked. Click on the “Next Step” button.
Step 6: Configure SMTP Server
Next, you need to configure the Simple Mail Transfer Protocol (SMTP) server for your personalized domain. Choose the option “Send through Gmail” and click on the “Next Step” button. Gmail will automatically fill in the SMTP server details. Make sure the port is set to 587, select the “Secured connection using TLS” option, and click on the “Add Account” button.
Step 7: Verify Ownership
Gmail will now send a verification email to the email address associated with your personalized domain. Open the verification email and follow the instructions to confirm the ownership of your domain. This step is essential for ensuring your emails are sent seamlessly using your personalized domain.
Step 8: Select Default Email Address
In the “Send mail as” section of your Gmail settings, you can choose your personalized domain as the default email address. This means that when composing a new email, Gmail will automatically use your personalized domain instead of your Gmail address. Select your personalized domain from the drop-down menu and click on the “Make Default” button.
Step 9: Test and Troubleshoot
To ensure everything is set up correctly, send a test email to another account. Verify that the email is received successfully and that it displays your personalized domain in the sender’s field. If you encounter any issues, double-check the DNS records and SMTP server settings in your domain provider’s management console.
Congratulations! You have successfully set up a personalized Gmail domain. From now on, you can send and receive emails using your personalized email address, which adds a professional touch to your online communications. Remember to check your personalized domain’s email inbox regularly to stay connected with your contacts.
In conclusion, setting up a personalized Gmail domain is a simple process that enhances your online presence and professionalism. By following this step-by-step guide, you can create a unique and memorable email address that represents your brand or personal identity effectively. So, don’t wait any longer, set up your personalized Gmail domain today!
[ad_2]