[ad_1]
Boost Your Professional Image: A Step-by-Step Guide on Creating a New Gmail Account for Your Business
In today’s digital era, establishing a professional image is essential for any business. The way you communicate and present yourself online plays a crucial role in shaping how customers perceive your brand. One powerful tool that can significantly enhance your professional image is a dedicated email account for your business. In this article, we will provide a step-by-step guide on creating a new Gmail account specifically tailored to meet your business needs.
Step 1: Determine Your Business Name
The first step towards creating a professional Gmail account is choosing a name that accurately represents your brand. It’s crucial to select a name that is relevant, memorable, and easily recognizable. Avoid any slang or personal terms that may confuse or alienate potential customers.
Step 2: Sign Up for Gmail
To create your new Gmail account, visit the Gmail homepage and click on the “Create account” option. You will be prompted to fill in the necessary details, including your chosen business name, a password, and other required information. Ensure your password is strong and secure.
Step-by-Step Guide: How to Create a Business Account on Gmail.com
Step 3: Personalize Your Account
After setting up your account, you can customize it to reflect your business branding. Add a professional profile picture, such as your logo or a headshot if you are a sole proprietor. This personalization will increase brand recognition and help customers easily associate your emails with your business.
Step 4: Enable Two-Step Verification
Securing your account is essential to maintain your professional image. Two-step verification adds an extra layer of security by requiring a secondary authentication method, usually a code sent to your phone. Enabling this feature ensures that only authorized individuals can access your account, safeguarding sensitive business communications.

Step 5: Create a Customized Signature
Most email providers, including Gmail, allow you to create customized email signatures. Take advantage of this feature to showcase your professionalism and provide crucial contact information. Include your name, title, company name, contact details, and any social media handles relevant to your business. This signature will be automatically added to every email you send, making it easy for recipients to learn more about your brand.
Step 6: Organize Your Emails with Labels
As your business grows, handling a high volume of emails can become overwhelming. Gmail’s labeling feature allows you to categorize your messages for better organization and quicker access. Create different labels based on departments, clients, or specific projects to maintain a streamlined and organized inbox.
Step 7: Utilize Filters and Folders
To further enhance your email organization, Gmail offers filters and folders. Filters allow you to sort incoming emails automatically based on specific criteria, such as sender, subject, or keywords. Folders, on the other hand, are a manual way of categorizing emails. Utilize both features to prioritize and efficiently manage your business communications.
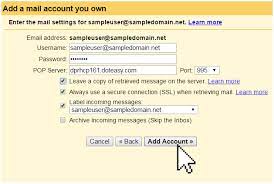
Step 8: Set Up Email Forwarding
If you already have an existing email account for your business, you can set up email forwarding to ensure all communications are redirected to your new Gmail account. This allows you to consolidate and streamline your email management while maintaining consistent brand communication.
Step 9: Explore Additional Features
Gmail offers various additional features and integrations that can enhance your professional image and productivity. Research and experiment with options such as mail templates, canned responses, and email scheduling to find which tools benefit your business the most.
Step 10: Train Your Team
If you have a team working with you, it’s crucial to educate them on the proper use and management of the new Gmail account. Teach them best practices for email communication, maintaining security measures, and effectively utilizing Gmail’s organizational features. Regular training sessions will ensure a consistent and professional image across all business communications.
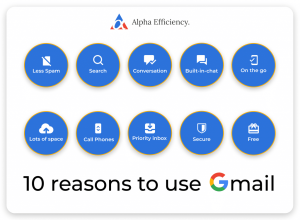
In conclusion, creating a dedicated Gmail account for your business is a valuable step towards enhancing your professional image. By following these steps, you can establish a branded, secure, and organized email system that will positively influence how your customers perceive your business. Embrace the power of Gmail and elevate your business image to new heights.
[ad_2]